Google Search

Custom Search

Tuesday, January 26, 2010

Who’s link to my blog?

“Who’s link to my blog?” Many bloggers often ask this question, especially those who are still new and want to know who link to their blog. Well, To know who link to our blog is very easy. You only need to register your blog into http://www.technorati.com. By being their member, you will be able to know who link to your blog.

How can we do that? Simple, you type your site or blog in their search engine, for example; now, go to http://www.technorati.com and type my URL blog http://www.blogspottutorial.com in their search engine and then click Search. Automatically, it will show the blog or sites that link to this blog.

What do you think? Are you interested in it? Of course, I am? That’s why, I really recommend you to register your blog or site to technorati.

If you still get confused on registering in http://www.technorati.com, just follow the following steps……ok.

  1. Please, visit http://www.technorati.com
  2. Click Join (located on the right top)
  3. Fill in some forms available
    • Member name »» write with your desired name: example; Rohman .
    • E-mail Address »» write your e-mail; example; kolom@yahoo.com.
    • Choose password »» write your desired password; example; jayakatwang.
    • Confirm password »» write your password again. Example; jayakatwang.
  4. Give a check in the small square of I agree to Tecnorati's Privacy Policy and Terms of Service.
  5. Then, click Join.
  6. When you are in your account page, look at the left bottom of the screen
  7. Click Claim your blog
  8. Type your URL blog, example; http://www.blogspottutorial.com
  9. Click Begin claim and wait a moment
  10. After Quick Claim and Post Claim appear, click Use Quick Claim
  11. Fill in the form of Blogger Username with your username
  12. Fill in the form of Blogger Password with your password
  13. Click Quick Claim Now
  14. After “Congratulations! Appears, Next you fill in Edit Blog Settings.
  15. Fill in the description form with your blog description, example; a practical guide to make a blog in blogger.com
  16. Choose the main language of your blog in language form
  17. Fill in the Tags with the keywords related to your blog, example; Tutorial, blogger, blog tutorial and others
  18. Copy the code of Favorite Buttons that you will put in your blog.
  19. Finally, click Save Blog Info
  20. Finish.

The steps above are only for registering into technorati. If you want to know the others function, you can find and learn by yourself in your account.

Now, if you have registered in technorati and would like to know who link to your blog, just check it there…ok.

And as additional information for new blogger, you shouldn’t be surprised if your blog is suddenly visited by me, though your URL blog hasn’t been published yet. The answer for this is only one, you have ever tried to make a link to this blog and noted in technorati. Would you like to prove it? You simply click the banner below and see the blog which has a link to this blog.


Have a great trying and see you at the next posting.

Knowing the frame order

For today’s tutorial, I would like to tell about one of the functions of HTML code, that is

Some atributes that are often used in iframe are;

ALIGN="left/right" »» managing the iframe position
WIDTH="wide" »» managing the width of the iframe in pixel or percentage

HEIGHT="high" »» managing the height of iframe in pixel or percentage

FRAMEBORDER="frame border" »» giving the frame border

SCROLLING="auto/yes/no" »» giving or not giving scolling in

SRC="url address you want to use" »» url address that you want to show in iframe

To make you understand more, I give you twho sample of the

And the result is ;


  • IFRAME that has frame order and scrolling facility.

So, the code sample that I use is as below;


And the result is ;


Well, what do you think friends? With iframe, we surely can see the content of others blog in our blog. But, remember to ask the permission to the blog owner first if you don’t wish to get angry from them.

Have a nice experiment…pals!

Making Left and Right Sidebar

minima-3-column A few weeks a go, I posted on how to make a new sidebar in minima template. I changed two sidebar template into three sidebar template. That posting has many comments from the readers. They gave the comments in shout box or in comment form. Their comments are variety. Some readers told their happiness because they could make their blogs into three column, congratulation readers. But, some of them are still curious and need more for that posting. Below is one of the comments from curious and unsatisfied readers;

Kang…How can I put the main column in the middle or between left and right sidebar??? Please help me …Thanks.

Kang Rohman : Hmmmmmmmmm…wanna know how to do that?...well that’s secret!

Reader : Huh..Kang rohman is stingy

Kang Rohman : Just kidding

Reader : Please…

Kang Rohman : Ok…

To make a new sidebar isn’t difficult, you only need to place the float code in the left and add the padding-right isn’t so that the left column and the main column don’t touch each others. You are confused, aren’t you? Well, I make you confused clip_image001..Just kidding again?

For you who want to place the sidebar column in the left, please read this article first because the present article is the continuation of that article. I am afraid that if you directly read this article, you will get more confused.

Before I continue to tell you about this topic, I suggest you not to use your main blog to do this tutorial but the use the other or trial blog. Why? In order to anticipate the unexpected result. If this experiment doesn’t work well, it will not damage your main blog…right? But only damaging your trial blog.

Ok, my friends..let’s start. I assume that you have made or created a new column. First, never give a check for Expand widget Template box. If you do it, it will give you a very complicated and confusing widget code.

In my previous posting, I wrote this code;


/* Outer-Wrapper
------------------------------------------ */

#outer-wrapper {
width: 840px
margin:0 auto;
padding:10px;
text-align:left;
font: $bodyfont;
}


#main-wrapper {
width: 410px;
float: left;
word-wrap: break-word; /* fix for long text breaking sidebar float in IE */
overflow: hidden; /* fix for long non-text content breaking IE sidebar float */
}


#sidebar-wrapper {
width: 220px;
float: right;
padding-left:10px; /* yg ini tambahan juga biar tampak ada jarak sela */
word-wrap: break-word; /* fix for long text breaking sidebar float in IE */
overflow: hidden; /* fix for long non-text content breaking IE sidebar float */
}


#newsidebar-wrapper {
width: 180px;
float: right;
padding-left:10px;
word-wrap: break-word;
overflow: hidden;
}


I order to make different result with the previous posting. I mean that the column isn’t in the right but in the left, you should only change the code a little. Please, look at the red code below and change them into:


#newsidebar-wrapper {
width: 180px;
float: left;
padding-right:10px;

word-wrap: break-word;
overflow: hidden;
}

If you see the blue codes, you only need to change the two line code and don’t change the others code. After changing it, don’t forget to save the template.

Next, go to the bottom of your template and find body. In the previous posting, I suggested you to put the code like this ;


Now, if you want to place the new sidebar in the left side, then you have to move that sidebar code above the main code (posting). The whole codes will look like the following:


Remember to click save template after finishing it. Finally, view the result…..what do you think? do you like your new template? I think so.

It is easy, isn’t it? Hopefully you understand my explanation and if you want to see the sample blog with the sidebar in the left and right, you can see it here.

Ziddu.com : Free Unlimitted File Hosting

sign up to ziddu here!

Now, Kang Rohman would like to share about Ziddu.com. Do you know Ziddu.com? Ziddu.com is a Free Unlimited File Hosting which gives a commission to their members if their videos, photos or documents are downloaded by others. Why does ziddu.com pay their members? and where does ziddu.com get the budget or money to pay them?

Well, it is very simple to answer you know and here is why????

If we upload more files, it will give more chances for Ziddu.com tobe visited by others who want to download their files. When uploading or downloading the files, indirectly we are also their visitors and help Ziddu.com to increase the traffic. As we know, if a website has a high traffic, for example; thousand traffics or even million traffics, it will invite the businessmen/advertisers to put an ads in that website (in this case, Ziddu.com). So, Ziddu.com gets the money/budget to pay their member from the advertisements in Ziddu.com.

How does Ziddu.com pay us? You will get $0.001 for every file which is downloaded by others. The commission will be paid through paypal or money bookers when your earning has minimal $ 10.

As well as getting the dollars from the downloaded files, you can also get the dollars through your affiliation or inviting somenone to join Ziddu.com. We will get $0.10 for one referral. There are many ways to invite our friends to join Ziddu.com, such as sending e-mail to your friends (but do not be a spammer…ok), or you can use the most effective way, that is blog. Like what I am doing now, inviting you to join Ziddu.com.

Ok friends, from now if you like to share your files or try to get some dollars, don’t think twice or too long , click the banner below to join…ok.

sign up to ziddu here!

I don’t have a paypal account. Don’t worry, just click the banner below to make a paypal account.

How To Make Blur Effects In The Photo or Image

Hello, my friends, it is weekend again and in this lovely weekend, Kang Rohman wants to follow up one of the question from the bloggers. The question is

“ Kang Rohman, How can I make blur effects in the photo in the blog?”.

Actually, In order to make a blur effect in the photo is not difficult; we only make a little code to create it. Please drop your mouse into the photo below so that you understand my explanation.

kang rohman

Please read the following steps to make the blur effect like the photo above.

1st Steps

  1. Log in into blogger with your ID
  2. Click the Layout
  3. Click Edit HTML tab and don’t forget to click Download Full Template and Back up the template first. (very important)
  4. Find the following code ]].>, then Copy and Paste the code below above ]].>

    .linkopacity img {
    filter:alpha(opacity=30);
    -moz-opacity: 0.30;
    opacity: 0.30;
    border:0;
    }
    .linkopacity:hover img {
    filter:alpha(opacity=100);
    -moz-opacity: 1.0;
    opacity: 1.0;
    border:0;
    }
    .linkopacityxtra:hover img {
    filter:alpha(opacity=1.1);
    -moz-opacity: 1.1;
    opacity: 1.1;
    border:0;
    }

  5. Save the template

2nd Steps

Every time you want to put a photo or picture, insert this code;

URL target" class="linkopacity">Image URL source">

For example, I have the URL address of the photo or picture like this;


http://24rohman.googlepages.com/Water-06.jpg


And I want to link that URL address to http://www.blogspottutorial.com, so I have to put the code below;


http://www.blogspottutorial.com" class="linkopacity">http://24rohman.googlepages.com/Water-06.jpg">


and the result will be like this. Please drop your mouse and click the image if you want:


blogspot tutorial


But If you don’t want to link the photo or picture anywhere, just change the URL address with the following code #nogo, for example;


#nogo" class="linkopacity">http://24rohman.googlepages.com/Water-06.jpg">


and then this is the result, just drop your mouse and click it. It doesn’t happen anything, right?


klik saja soalnya ga akan ke mana-mana


Ok, my friend, do you understand? I think you do. For showing the pictures in the blog was explained completely by me with the title Google page creator. You can read again if you forget or still do not understand.

I give you a little clue about CSS code above, you can change the level of blurring the picture by adding or reducing the opacity value, for example;

.linkopacity img {
filter:alpha(opacity=30);
-moz-opacity: 0.30;
opacity: 0.30;
border:0;
}


The opacity value = 30 is reduced into opacity = 30 (this is example only), so the picture will look to have more blur, example;

.linkopacity img {
filter:alpha(opacity=10);
-moz-opacity: 0.10;
opacity: 0.10;
border:0;
}

You can do your own experiments to get better result. Ok, see you at the next posting and don’t miss it dude.

Change the width of the dropdown archive

drop-down-archive_03 Hello, friends. How are you today? I hope everything is OK with you, so you can keep blogging and coming to Kang Rohman’s blog. Today, I would like to share about dropdown archive in blogspot.

Now, view your blog and see if it uses a dropdown archive or not? If it uses the dropdown archive, do you feel comfortable with the size of its width? Many bloggers do not feel comfortable with it because it isn’t suitable with the width of the sidebar. If you also feel uncomfortable with its width, you can change it so that it has the same width as its sidebar. So, how can I do it? Don’t worry my friends! Just read the instructions below until finish…Ok.

Before doing this one, make sure that your blog uses a dropdown archive.

  1. Log in into blogger with your ID
  2. Click Layout
  3. Then, click Edit HTML tab
  4. Please back up or save your template before editing it by clicking Download Full Template. (very important).
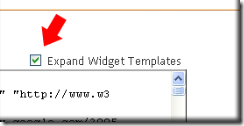
  5. Give a check in a small square next to Expand Template Widget and wait for a few seconds.

    expand-widget

  6. Find the code below


  7. Erase the above code and change with the code below


  8. Click “Save Template” and Done.

  9. View your blog and see the result.

What do you think of the present dropdown archive? You like it, don’ you.

Actually, from the explaination above, we only add this code style='width:100% in available dropdown menu, and of course, the value of style='width:100%' can be changed with the others value.

Have a nice trying and Good luck!!

Sunday, January 24, 2010

How To Make A Link Into Colorful Winks

A few days ago when I was opening my blog and reading the comments, someone asked me the following questions.

Assalamu alaikum wrw. Kang! How can I make a link that its color changes automatically in turn, I think my blog would be nicer with that features”. I mean, when I drop on a link, the color of the link will change in turn automatically. Can we do that Kang?

Sure, we can but we must use a script. One of free script that we can use is rainbow script from http://www.dynamicdrive.com.

Just follow the following steps if you would like to know how to do it.

Step 1 :

  1. Make sure to download the rainbow script, click on the below link.

    Mirror 1 (ziddu)

    download 1 (ziddu)

    Mirror 2 (Bizhat)

    download 2 (bizhat)

  2. Extract it (Zip file) into java file (js file) by using extractor software, suc as; winzip or winrar.

    image

  3. Upload the file (the file that you have extracted) into the server, which you usually use to save the file, e.g. google page creator.

  4. After uploading it, take the URL of the file, for example ( it is sample only, do not use it) and make the URL like this (sample only).

    http://kangrohman.googlepages.com/rainbow.js

  5. Create code like this :

Blogger features

new blogger features This information might not be really up to date but I think It will be ok if kang rohman write this information again. It is about Blogger features that get more complete and complete. After staying in blogger draft for a long time, the control panel now has changed into the new control panel. (If you haven’t seen it yet, please log in into blogger).

What makes me interested and really take my attention is about the page element. In the past, if we wanted to add the page, we had to click on “Add a page element”. But now, if we want to add a page element, we click “Add a Gadget”. And this the most important thing, by adding or clicking Add a Gadget, you can get many kinds of features from blogger, such as:

Basic :

  1. Blog List.
  2. Slideshow.
  3. Subcription Links.
  4. Poll.
  5. List.
  6. Link List.
  7. Picture.
  8. Adsense.
  9. text.
  10. HTML/Javascript.
  11. Feed.
  12. Labels
  13. Newsreel.
  14. Video Bar.
  15. Logo.
  16. Profile.
  17. Blog Archive.
  18. Page Header.

Featured :

  1. Blogger Play.
  2. Digg.
  3. You Tube.
  4. Nasa Photo of the Day
  5. National geographic Photo of the day.
  6. Qoute of the Day.
  7. Countdown.

Most Popular :

  1. Search YouTube.
  2. Weather forecast.
  3. this day in History.
  4. World Clock.
  5. Astronomy Picture of the Day.
  6. Collapse.
  7. Wic Wac Woe.
  8. Aircraft Lander.
  9. NBA TV.
  10. Van Gogh Painting of the Day.
  11. Pablo Picasso Art of the Day.
  12. The Art of Gustav Klimt.
  13. useless Knowledge.
  14. Daily jokes.
  15. Google Music search.
  16. Salvador Dali Fine Art of the Day
  17. Watch ABC, CBS, CW, FOX, NBC shows online.
  18. This Disturbing World Wide Weird.
  19. Jokes from South Africa.
  20. Dodgebal.
  21. teleMessage SMS sender.
  22. Billboard News.
  23. play-20230-Crash_Down.
  24. Vintage Art of the Day.
  25. Untill »» 45399 new features.

Because there are so many features that make Kang Rohman really tired to write. Can you imagine? There are 45399 features from blogger and if I write all of them, my hands and fingers would be stiff and protesting (well…just kidding).

Now, what features would you like to add to your blog? Just see, choose and add to your blog. I hope the feature would make your blog nicer and nicer.

Blogger gets cooler and top…do you agree with me?

Google Bookmark

For you guys, who already used to use internet, you must be know Favorites menu on Internet Explorer, or Bookmark on FireFox. With those facilities, we would easily find website or blog address that we already save there, to be visited again in the future. But, there is disadvantage on Bookmark menu, which is bookmark in the computer is offline. Specifically, word ‘offline’ means, bookmark will only work for that computer.

For you, who often change computers (don’t have own computer or using rental computer), will have more problem in using ‘bookmark’ than if you use personal computer. By using rental computer, it is difficult to be consistence in one computer. How do we solve those problems? The best solution is to use Online Bookmark Using Online Bookmark, we will easily put our favorite site addresses or blogs. We can open it in other computer next time. In one condition, our computer must be connected to Internet.

The way to use Online Bookmark is by using site which provides Online Bookmark. Such as Google Bookmark, Del.icio.us, Digg.com, and many others. The one that I will explain to you is Google Bookmark. First thing you must have is Google account. Don’t have any Google account yet? Make it easily by click here!. If you already have Google account, let’s we begin this tutorial. Just follow instructions below!

  1. Please check out Google Bookmark.
  2. Please login with your Google Account.
  3. Click Add Bookmark sentences.
  4. Fill the form that shown to you.

    • Name → fills it with the name that you desire.
    • Location (URL) → fills it with any of your favorite sites. If you love this site, simply type http://blogtutorial123.blogspot.com/ in it.
    • Label → fills it categories that you desire to, such as: blog or blog tutorial.
    • Notes → fill it with some notes that you use to remind you to that blog, such as: This is my most favorite blog or website!

  5. Click Add Bookmark button!
  6. It’s done!

With this Online Bookmark, never gets worried to lose your notes or bookmark. Want to open it in other places, region, country, no problem! Just connect it to Internet, go to Google Bookmark, and easily visit your favorite sites!

Tips to Make Multi Column on Blogger Template

Hi guys? Meet again with me on Blogspot tutorial. This time, I would like to share my trick and tips to make multi column on blogger template. Like in wordpress, maybe you ever see any footer column which split into 2, 3, or even 4 parts. The question is, “do we can make the same thing in Blogger?” Of course we do. It will be very easy to build. Do you want to know more? Read it till end!

To make footer part become one column, it isn’t difficult as you imagine. But, you need a little trick to make the footer blog have multi column. To make you understand, I advise you to try it. Make a new blog for this little experiment (don’t do it on your main blog). In order to avoid any accident that might be happen..

First preparation that we need to give attention most is, width of our column that will be split into multi column, quantity of column that we going to make, space between one column to another column. But, templates in Blogger are so much. To make a deal with those problems, let’s use template Minima. Minima is original template that provide by Blogger with optional color white. Number of column that we are going to make is three column.

Original Minima template has 660 pixel column widths. We are going to make three columns, if we calculate it : 660px divide by 3 = 220px. With space (code to make space is padding) between column is 10px. Based on result of my calculation, column that we will make is 205px.

This is the steps to make multi column on blogger template :

Step 1:

  1. Don’t give a tick on white little box beside sentence, “expand widget template”. Or it will be twice more difficult.
  2. Add the code below exactly above code ]]>

    /* bottom
    ==================== */

    #bottom {
    width: 660px;
    position: relative;
    clear:both;
    margin: 0 auto;
    color:#fff;
    float: left;
    background:#BDBABD;
    padding: 15px 0 15px 0;
    }

    #bottom h2 {
    padding: 5px 0 2px 0;
    margin: 0 0 10px 0;
    color:#ff5a00;
    font-size: 24px;
    letter-spacing: -1px;
    border-bottom: 1px solid #fff;
    }

    #bottom ul {
    padding: 0;
    margin: 0;
    }

    #bottom ul li {
    line-height: 26px;
    list-style-type: none;
    border-bottom: 1px dashed #031c5d;
    }

    #bottom ul li a {
    display: block;
    padding: 0 10px;
    color:#0701FD;
    text-decoration: none;

    }
    #bottom ul li a:hover {
    background: #B1ACB1;
    }

    #left-bottom {
    width: 205px;
    float: left;
    padding-left:10px;
    }

    #center-bottom {
    width: 205px;
    float: left;
    padding-left:10px;
    }

    #right-bottom {
    width: 205px;
    float: left;
    padding: 0 5px 0 10px;
    }

  3. Head to body under part of template code. Find out codes like this:


  4. Copy and paste code below exactly above of the previous code.

  5. Click Save Template Buttons.

  6. It’s done!

Step 2:

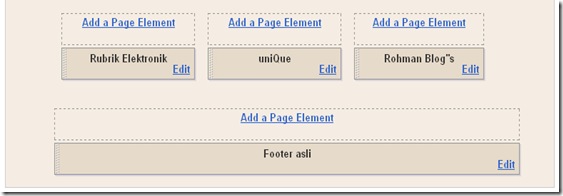
  1. Click Page Element tab.
  2. Are your new columns already become three?

bottom-page

If it hasn’t success yet, you must be missing something. If you already success, congratulations on you.

Well… do you want to see the examples? Just click here! Or, you can see at the bottom of this page.

Good luck!

Tips to Add Column on New Blogger Layout

Because of so many questions about, “How do we add column on the blog?” Finally, I decide to spent a little of my time to write this article. Actually, adding a new column to our blog doesn’t so hard. But still, we need bit knowledge to do that.

In this chance, I will explain to you about, “how to make a column without images help.” As usual, I will just use template Minima, you know that, this is official template which provide by Blogger and don’t use any picture.

Based on standardizations from Blogger Template, we will know that, a template must have three main elements. That is:

  • Header Element
  • Outer Element
  • Footer Element

For Outer, it’s divided again into:

  • Main Element. This is the element where we can save posting. So, any posting that we send to our blog will be shown here.
  • Sidebar Element. This is the elements to save any blog tools either accessory that we want, in order to decorate our blog.

From dissatisfaction from ‘only one sidebar’, if somehow we want to add some additional sidebar, we need to add it manually. I’ll clear it for you. I’ll show you an original template code from template Minima (New Template/XML)


<data:blog.pagetitle/>


From the code that I show to you, the one that we need to keep track of are some codes around Outer-Wrapper:

/* Outer-Wrapper
------------------------------------------ */
#outer-wrapper {
width: 660px;
margin:0 auto;
padding:10px;
text-align:left;
font: $bodyfont;
}
#main-wrapper {
width: 410px;
float: left;
word-wrap: break-word; /* fix for long text breaking sidebar float in IE */
overflow: hidden; /* fix for long non-text content breaking IE sidebar float */
}
#sidebar-wrapper {
width: 220px;
float: right;
word-wrap: break-word; /* fix for long text breaking sidebar float in IE */
overflow: hidden; /* fix for long non-text content breaking IE sidebar float */
}

Like what I’ve told you before, that Outer-Wrapper is a place to save main-wrapper and sidebar-wrapper. So, if you want to add a new column, or in other words, new sidebar, then something that we need to do first is adding column width from Outer-Wrapper itself.

Then, “How could we add a new column?” The first thing that you need to think about is, “how much longer width of my new column?” Okay, to make this thing clearer, I will take an example, width that we going to work for is 180 pixel, so we do need to change width of Outer-Wrapper, so we can estimate that width of our Outer-Wrapper is: 410 pixel + 220 pixel + 180 pixel + 20 pixel = 830 pixel. For some spaces, let’s give it plus 10 pixels, so we got 840 pixel widths for our sidebar. To add new side bar code, please look at the example below.

#newsidebar-wrapper {
width: 180px;
float: right;
padding-left:10px;
word-wrap: break-word;
overflow: hidden;
}

Then, if we add the code, it will be like this.

/* Outer-Wrapper
------------------------------------------ */
#outer-wrapper {
width: 840px;
margin:0 auto;
padding:10px;
text-align:left;
font: $bodyfont;
}
#main-wrapper {
width: 410px;
float: left;
word-wrap: break-word; /* fix for long text breaking sidebar float in IE */
overflow: hidden; /* fix for long non-text content breaking IE sidebar float */
}
#sidebar-wrapper {
width: 220px;
float: right;
padding-left:10px; word-wrap: break-word;

overflow: hidden; /* fix for long non-text content breaking IE sidebar float */

}

#newsidebar-wrapper {
width: 180px;
float: right;
padding-left:10px;
word-wrap: break-word;
overflow: hidden;
}

That is the first step that we do. The second step is to make code that will be placed in body. As example on template that I just write, code id for sidebar are like this:

Our next duty is placing code for new id sidebar that we going to do. The code would be like this.


Then, after we mix it, just save new sidebar code under original sidebar code. The code would be like this.


Our new column already created. Want to make it more interesting? Then we should change the header width and footer width, with exactly same pixel as the Outer-Wrapper that is 840 pixels.

Still doesn’t get it?

In order to understand what I told you clearly, just give it a try. Make a new blog for the experiment (don’t use your main blog to this experiment!). Choose the usual Minima template. Are you ready? Let’s keep moving!

  • login in on Blogger
  • Click Layout
  • Click Edit HTML tab.
  • Just keep in mind! Never give a tick in white little box beside sentence Expand Widget Template. Once again, don’t give it a tick, or you will see pretty annoying widget codes.
  • Find out code like this:


  • Change value 660px with 840px, so the code will be like this.


  • Find the code below


  • Change value 660px with 840px, so the code will be like this.


  • Find the code below :


  • Copy and paste this code exactly below the previous code :


  • Find the code below :


  • Change value 660px with 840px, so the code will be like this.


  • Find the code below :


  • Copy and paste this code exactly below the previous code :


  • Click Save Template button
  • Well, it’s done!

To see the result, just click Page Element, does it already work and become 3 columns or not. If it’s already done, feel free to fill up that side bar with anything you want to, and see the real result.

Steps that I mention to you before was just basic methods. To add other variations, you will need more knowledge and creativity. For make sure of you about what I explained to you, here, you can see the example. click here!

Good luck!

Thursday, January 21, 2010

How to make element below of the header

Like what I’ve told you before in my previous post, “Saving widget below of the header”, I said that, there are still a lot of ways to saving widget or element, exactly below the header. Today, I will give you a new technique. With this, you will be able to make a new column, exactly below the header. Want to figure it out? Here we go……

In order to make a new column, we only need to put a little ‘spices’ like CSS code and HTML code in your template code. And this won’t be as hard as you imagine. Just follow my instructions below:

  1. 1. Login to Blogger with your ID.
  2. Click Layout
  3. Click tab Page Element. Look at your layout template structure. Usually it will be like this:

    header elemen

  4. Now, we are going to make a new column exactly below of your header. Hehehe… feel nervous?
  5. Okay then, click tab Edit HTML.
  6. Click sentence Download Full Template, it is very important for you to backup this!
  7. Copy the code below, then paste it before code ]]>

    #under_header{
    margin:10px 0;
    padding:1%;
    width:98%;
    }

  8. Find out code which look exactly like this :


  9. Copy the code below, and paste it exactly after that code :


  10. Click SAVE TEMPLATE buttons, and wait until your template saved.
  11. Click tab Page Element and your layout structure will be like this…

    header_element

  12. Yahuuuuu…. Now you already have an element which placed exactly below your header. Feel free to add any elements do you wanted to. Want some Google Advertise, or maybe some photos, it’s all up to you!

  13. 1. Final step…. It’s done (Hurray!!)

Codes that I have shown to you aren’t unconditional. That’s only the simplest codes, for making this tutorial. Feel free to change it and reconstruct it as much as you can. See you…

Save Widget Below of the Header

Few days ago, there are some friends who ask me, “ How to save widget below header exactly? ” Generally, we can’t save widget or element, right in below of header in Blogger template. Usually, we can only put element or widget in top of Post element, but of course width of that element just as wide as ‘post width’. Then maybe you will ask me, “ Do we have some ways, to save widget or element, exactly below the header? ” The answer is…. Of course, we can…. In fact, we have a lot of ways for fix that thing. But, in order that there are limitations of times and places, I can’t write all of the tricks here. I will only give you one way for fix that problem. Ready? Okay then, here we go….

Follow my instructions below:

  1. Login to Blogger with your id.
  2. Click Layout.
  3. Click Page Element tab, look at the structure of your layout template. Usually, the header element will be show like this :

    header elemen

  4. We are going to fix this thing. Let’s begin the party!!!
  5. Just click Edit HTML tab.
  6. Click sentence Download Full Template, you must backup this thing. It’s very important!
  7. Find out codes which like this :

  8. Delete that code and change with this one:

  9. Click Save Template button. Wait ‘till this is done.
  10. Click Page Element tab and your layout template will be like this :

    header-element

  11. Feel please to customize your blog with a new Page Element below the header.
  12. In order to add Page Element, you can click Add Page Element. You can add anything you want. And then, you can drag the new element, below of header elementr, if you already finish your business with your new element.
  13. If your setting was done, just click SAVE in top of that page.
  14. Well done, now see the result.

Happy blogging to all.

Adding image Banner to Your Header Blog

My friend ask me how to add a banner (picture) to header blog. Are you too? these is the guides to add a banner to your header.

First of all, you must make a banner. You can create your banner with several tools such as adobe Photoshop or corel draw. You can also create it, with online banner maker tool, such as http://cooltext.com.


example :


And then upload your banner to image hosting, to upload a banner to image hosting you can read my previous post at Upload to image hosting or Google page creator.

For example, i has been uploading a banner and have an address :
Okay, now you are ready to set your banner in your blog. Here, this is some guides to add a banner to your header.

For classic template :

  1. Login to blogger with your ID.
  2. Click Template.
  3. Click Edit HTML tab.
  4. Backing up your template (very important!)

  5. Find these code below :

    #header{
    .........
    .........
    .........
    }

  6. Insert your banner URL like this :

    #header{
    .........
    .........
    .........
    Background:url(http://kangrohman.googlepages.com/blogtutor.jpg) no-repeat center top;
    }

  7. Click Save Changes Template button.
  8. Done.

For new Blogger template :

  1. Login to blogger with your ID
  2. click Layout.
  3. Click Edit HTML tab.
  4. backing up your template (very importat!).
  5. Find these code below :

    #header{
    .........
    .........
    .........
    }

  6. Insert your banner URL like this :

    #header{
    .........
    .........
    .........
    Background:url(http://kangrohman.googlepages.com/blogtutor.jpg) no-repeat center top;
    }

  7. Click Save Template button.
  8. Done.

Especially for new blogger, you can do some different trick.

  1. Login to blogger with your ID.
  2. Click Layout.
  3. Click Page Element tab.
  4. Click edit at Haeder Element, refer to picture below :

    header element

  5. Check the radio button for From your computer, Click Browse.. button and then insert your banner file at your computer. Choose Behind title and description if you want your banner behind your blog title or Instead of title and description if your banner want at the front of your blog title.

    insert a banner to header blog

  6. Click Save button.
  7. Done. Now you have a picture at your blog.

Embedded Comment Form Under Post

As i say at my previous post, one of the new features from blogger.com is Embedded Commenet From, now you will have a comment form under your post.

The screenshot would be like this :


comment form under post

Are you ready to do some action? Below are the steps to get Comment Form under Post!


  1. Login to http://draft.blogger.com with your blogger ID. Just remember, you should login to http://draft.blogger.com not to http://blogger.com because this feature is still in draft.

  2. Click Settings.

  3. Click Comments tab

  4. Go to Comment Form Placement and choose Embedded below post. Refer to picture below :

    embedded below post

  5. Click save Settings button.

  6. Done.


Please View your blog and click your post title to open your post and you should be able to see the comment form under your post. Are there success? If those things didn’t work please follow the steps below :

  1. Click Layout tab.

  2. Click Edit HTML tab.

  3. Click Download Full Template. Please back up your template (important!)

  4. Please tick the little box beside Expand Widget Templates. Refer to picture below :


    expand-widget.png


  5. Find the code like this (some of template is different, please focus on Green color and some template have two code, please choose the code at your bottom template code:


  6. Delete the above code and replace with codes below :


  7. Click SAVE TEMPLATE

  8. Done. Please see the result.


Also you can read this tutorial in bahasa indonesia, please read at this post.

New Features From Blogger.com

Hi all! i have got a good news from http://bloggerindraft.blogspot.com, they will launch several features. They are Webmaster Tools Verification, Star ratings, Import/export of blogs, New Post Editor, and Embedded Comment Form.

The features is still in draft, However you can add the features to your blog now. Please login to http://draft.blogger.com with your blogger ID. Still comfused to add the new features to your blog? Allright, i will explain that one by one at my next post. See you at my next post, don't miss it.

Free Tool : Scott Box Shot Maker 2.0

Hello guys! i'm glad to meet you again. Now i will give you a cool free tool, this tool named with Scott Box Shot maker 2.0. What's the function of Scott Box Shot maker 2.0? with Scott Box Shot maker 2.0 you can create an ebook cover very easy. Want to try this tool? click at the button below :


download here!


See you again at my free download tool.

Add Prayer Times widget to blog

Hi Readers! are you a moslem? want to add a prayer times to your blog? All right... you can do that. You can add a prayer times widget to your blog very easy and that all is free.

Where are we can get the “Prayer times widget”? There are a lot of site provide this service, one of them is http://www.islamicfinder.org. Below are the steps to adding prayer times widget to your blog.

  1. Please check out http://www.islamicfinder.org.

  2. Go to the bottom page. Click at Add new service to your site.

  3. Refers to the no.2. Click at the Drop down menu with Select a Country text.

  4. Choose your country name and then click Go button. Example : Indonesia.

  5. Choose your city. Example : Jakarta.

  6. Click Generated Code.

  7. Copy all of the code and then paste at the notepad or another text editor. Save at your PC.

  8. Done.


That is the steps to get a “prayer times widget” from http://www.islamicfinder.org. Next steps are, how adding the prayer times widget code to your blog. Here’s the steps :

For Classic Template (if you are still using old template)

  1. Login to Blogger with your ID.

  2. At the dashboard page, click Template.

  3. Click Edit HTML.

  4. Don't forget to back up your template code.

  5. Go to your sidebar code.

  6. Copy the Prayer times widget code at the notepad and paste at your sidebar code.

  7. Click Save Changes template button.

  8. Done.


For New Blogger template (if you using new blogger template (beta/xml))

  1. Login to Blogger with your ID.

  2. At the dashboard page, click Layout.

  3. Click Page Elements tab.

  4. Click Add a Page element.

  5. Click ADD TO BLOG for HTML/jacaScript.

  6. Copy the Prayer times widget code at the notepad and paste.

  7. Click Save Change button.

  8. Done.


The example of Prayer times Widget :

vertical widget :


horizontal widget :


Let's give it a try!

See you at my next tutorial. Happy blogging!

Tuesday, January 19, 2010

Built Your Readers Community With Mybloglog

mybloglog One of most important at blogging is building a community, with community you will be a profesional blogger. To build your blog readers community you can use mybloglog, also with mybloglog you can track your visitor because the photo of your readers will be display at your mybloglog widget (if your visitor is the member of mybloglog to). The other reason why you must join to mybloglog is you can increse your visitor.

Did you want to join with mybloglog? Remember, now mybloglog is the family of Yahoo.com, so you must have a yahoo account. Not yahoo account? please Sign Up here!. Already have a yahoo ID? please Sign in here! and get the widget of mybloglog such as the widget below :


Followers